Pool Cue Tip Replacement: Bring Your Game Back To Life
Is your pool cue tip worn out? You know, that little piece at the end of your cue stick that makes all the difference in your shots. A pool cue is an important piece of pool table equipment, and for real accuracy, that tip needs to be in tip-top shape. Over time, the tip of the pool cue can become worn out, and if you discover that your cue tip has the same problem, it’s time to get the pool cue tip replacement. This article will show you how to replace a pool cue tip, along with some fundamental points to keep in mind.
A worn-out cue tip can really mess with your game, you know? It can make even the simplest shots go off course, leading to frustrating misses and, well, less fun at the table. Many players don't realize just how much impact a fresh, well-installed tip can have on their control and precision. It's a bit like driving a car with bald tires; you just don't have the grip you need.
Thankfully, giving your cue a new lease on life doesn't have to be a big, scary project. It's actually a pretty straightforward process that many players can tackle themselves. We’ll walk you through the steps, so you can get back to sinking those balls with confidence and, like, really feel the difference in your play.
Table of Contents
- Why Your Cue Tip Matters
- When to Consider a Pool Cue Tip Replacement
- Tools You'll Need for the Job
- Your Step-by-Step Guide to Replacing a Cue Tip
- DIY vs. Professional Repair
- Frequently Asked Questions About Cue Tip Replacement
Why Your Cue Tip Matters
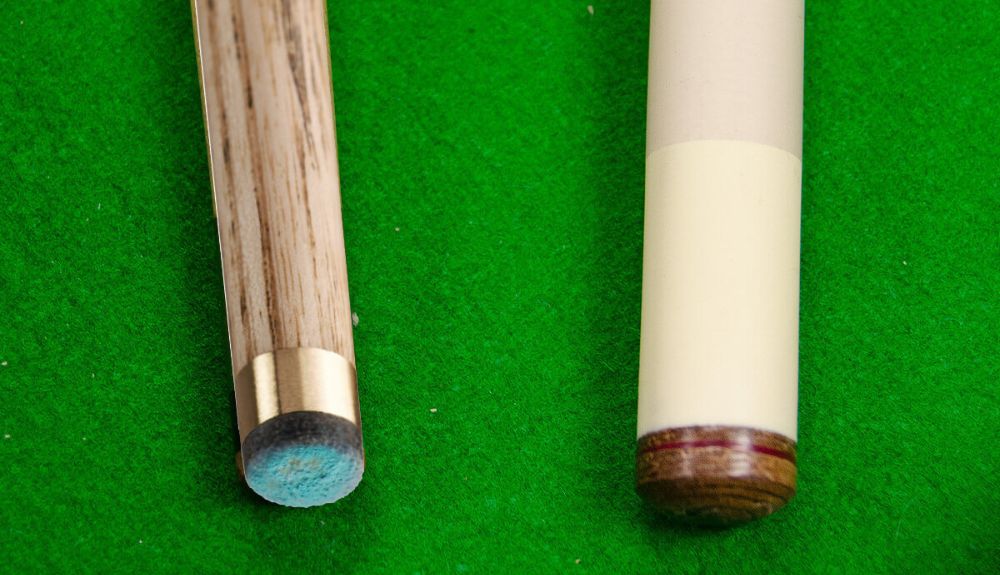
The tip of your pool cue is, in a way, the most important part that touches the ball. It's what gives you the spin, the control, and the feel for your shots. A good tip grips the cue ball just right, letting you apply English (side spin), draw (back spin), or follow (top spin) with precision. If your tip is flattened, hardened, or frayed, it can cause miscue after miscue, which is, you know, super annoying.
Basically, a fresh tip helps you make accurate shots, which is really what playing pool is all about. It's like having the right shoes for a run; you need that connection to the ground. Without a proper tip, your shots become unpredictable, and your game suffers. So, keeping that tip in good condition is a pretty big deal for any player wanting to improve.
When to Consider a Pool Cue Tip Replacement
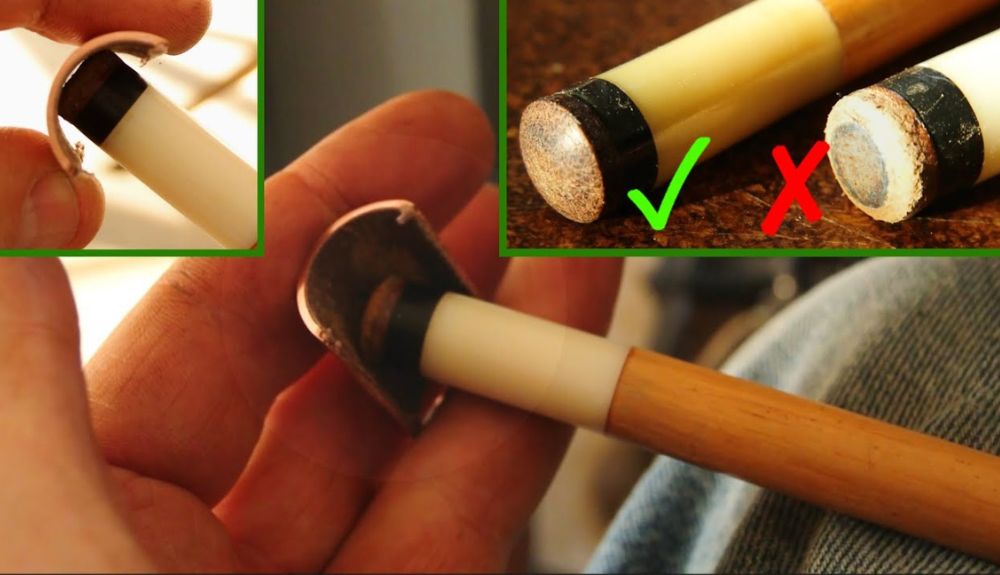
You might be wondering when it’s actually time to swap out that old tip. Well, there are a few clear signs. First off, if the tip looks flattened or mushroomed out around the edges, that’s a big clue. This happens from repeated impact with the cue ball, and it means the tip isn't holding its shape for good contact. Another sign is if the tip feels hard and slick; it should have a bit of texture to grip the ball, so a hard tip means less control and more miscues.
Also, if you start noticing that your shots aren't as accurate as they used to be, or if you're miscues are happening more often, that could be a worn tip talking. Sometimes, you might even see cracks or splits in the tip material. If you discover that your cue tip has any of these problems, it’s definitely time to get the pool cue tip replacement. It's a simple enough process, and it really makes a difference.
Tools You'll Need for the Job
Before you jump into replacing your cue tip, it's a good idea to gather all your tools. Having everything ready makes the process smoother and, like, way less stressful. You'll need a sharp razor blade or a specialized cue tip removal tool for getting the old tip off. A sanding block or sandpaper (around 100-220 grit) will be useful for preparing the ferrule, which is the white collar just below the tip.
You'll also need some strong, specialized cue tip adhesive – not just any super glue, as that can be too brittle. A cue tip clamp is super helpful for holding the new tip in place while the glue dries, ensuring a strong bond. Finally, you’ll want a tip shaper or a fine-grit sandpaper (400-600 grit) to shape the new tip to your liking and a tip scuffer to roughen the surface slightly for better chalk retention. Having these items on hand means you’re well-prepared for the job.
Your Step-by-Step Guide to Replacing a Cue Tip
Replacing a pool cue tip might seem a bit daunting at first, but it's really a straightforward process once you know the steps. These 5 easy steps on pool cue tip replacement are ideal for beginners and intermediate players. We'll cover essential tools, tips for a perfect installation, and the like. For more information, you could see “DIY tip replacement” (BD, May, 2021) as a reference. Let's get your cue back in top shape!
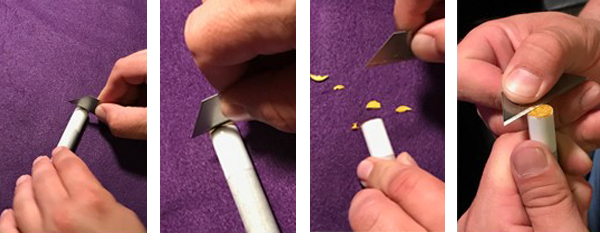
Step 1: Removing the Old Tip
The very first thing you need to do is get rid of that old, worn-out tip. You can use a sharp razor blade for this, but you need to be really careful not to cut into the ferrule, which is the white part right below the tip. Some people prefer a specialized cue tip removal tool, which makes it a bit safer and easier to get a clean cut. You want to slice off the old tip as close to the ferrule as possible, making sure the surface is flat.
It’s important to take your time here, so you don't damage the cue shaft or the ferrule itself. If you leave any old tip material behind, it can make it harder for the new tip to bond properly. A clean removal is, in a way, the foundation for a good replacement, so pay attention to this first step.
Step 2: Preparing the Ferrule
Once the old tip is off, the ferrule needs to be prepped for the new tip. This step is pretty important for a strong bond. You’ll want to use sandpaper, maybe around 100 to 220 grit, to gently sand the top of the ferrule. The goal here is to create a flat, slightly rough surface for the adhesive to grip onto. If the ferrule isn't perfectly flat, the new tip might not sit evenly, and that can cause problems down the line.
Make sure you remove any remaining glue or tip material from the ferrule. You can gently scrape it with the razor blade if needed, but again, be careful not to damage the ferrule itself. A clean, flat, and slightly textured surface is what you’re aiming for here, so the new tip has a good home.
Step 3: Applying the Adhesive
Now it’s time for the glue. You should use a strong, specialized cue tip adhesive. Don't just grab any super glue you have lying around; those can be too brittle and cause the tip to pop off during play. Apply a thin, even layer of the adhesive to the sanded surface of the ferrule. You don't need a lot, just enough to cover the entire top surface. Too much glue can squeeze out and make a mess, and it doesn't necessarily make the bond stronger.
Some people also put a tiny bit of glue on the bottom of the new tip itself, just to make sure there’s full coverage. The key is to get an even coat without any big globs. This careful application, you know, helps ensure a really solid connection between the tip and the cue, which is what you want for consistent play.
Step 4: Attaching the New Tip
With the adhesive applied, it’s time to put the new tip on. Carefully place the new tip squarely on top of the ferrule, making sure it’s centered. Once it’s in place, you’ll want to apply some steady pressure. This is where a cue tip clamp comes in really handy. The clamp holds the tip firmly in place while the glue sets, ensuring a tight bond and preventing the tip from shifting.
If you don't have a clamp, you can try to hold it firmly by hand for a few minutes, but a clamp is definitely recommended for the best results. Let the adhesive dry completely according to the manufacturer’s instructions. This might take anywhere from a few hours to overnight, so be patient. Rushing this step can lead to a weak bond, and that's just, like, not what you want.
Step 5: Shaping and Finishing
After the glue has fully dried, your new tip will likely be a bit wider than your cue shaft and might not have the perfect dome shape. This is where shaping comes in. You can use a sharp razor blade or a specialized tip trimmer to carefully trim away the excess material around the edges, making the tip flush with the ferrule. Be really careful here not to cut into the ferrule or the shaft.
Once the excess is gone, use a tip shaper or fine-grit sandpaper (around 400-600 grit) to shape the tip into a nice, smooth dome. Most players prefer a radius similar to a dime or a nickel, as this provides a good contact point for various shots. This shaping process is, in a way, what gives your cue its playability, so take your time to get it just right.
Step 6: Final Checks and Care
With the shaping done, you’re almost there. The last thing to do is scuff the surface of the new tip slightly with a tip scuffer or a very fine piece of sandpaper. This roughens the surface just enough to help it hold chalk better, which is pretty important for grip and preventing miscues. You don't want to over-scuff it, just a light roughing up. Also, check the tip to make sure it’s firmly attached and doesn’t wobble at all.
To keep your new tip in good condition, remember to chalk it regularly before each shot. Avoid hitting the cue ball off-center too often, as this can flatten or mushroom the tip quickly. Proper care, you know, will make your new tip last much longer, ensuring better accuracy and control in your game by keeping your cue in top condition. Learn more about pool cue maintenance on our site, and you can also find more information on our products.
DIY vs. Professional Repair
If your pool cue tip needs replacing but you don’t want to pay anybody else to do it, the only option is to do it yourself. There are a few steps, but it’s a simple enough process, as we’ve seen. Doing it yourself can save you money, and it gives you a good sense of accomplishment, too. It also means you can get your cue back in action quickly, without waiting for a repair shop.
However, for those who prefer not to tackle it themselves, professional services are always an option. Seybert's, for example, offers a variety of customizing and pool cue repairs anywhere from changing a tip to refinishing an entire cue. Seybert's billiard supply offers custom cue and shaft repair as well. They can give your cue new life with their professional cue repair. The knowledge and experience of their staff enables them to do all types of repair work on any cue. Your cue is an investment, and they can help keep it in top shape.
Our cue repair services for billiards ensure precision and performance, keeping your cues in top shape for every shot. Elevate your game with our professional services, if you prefer that route. Whether you do it yourself or have a pro handle it, making sure your tip is in good shape is, like, really important for your game.
Frequently Asked Questions About Cue Tip Replacement
How often should I replace my pool cue tip?
The lifespan of a pool cue tip really depends on how often you play and how hard you hit the cue ball. For casual players, a tip might last for many months, or even a year or more. For frequent or competitive players, you might find yourself replacing it every few weeks or months. It’s really about watching for those signs of wear, like flattening, hardening, or fraying. If you notice your shots aren't as crisp, that’s a good sign, too, that it might be time.
What type of glue should I use for pool cue tip replacement?
You should use a specialized cue tip adhesive, sometimes called "tip glue" or "billiard cue adhesive." These glues are designed to be strong yet flexible, allowing for the impact of hitting the cue ball without the tip cracking or popping off. Regular super glues or wood glues are generally not recommended because they can be too brittle or not provide a strong enough bond for the specific forces a cue tip experiences. So, it's pretty important to get the right kind of glue.
Is pool cue tip replacement difficult for a beginner?
For a beginner, pool cue tip replacement is actually quite manageable. It involves a few straightforward steps, and with the right tools and a bit of patience, most people can do it successfully. The most important things are to be careful when removing the old tip, make sure the ferrule is clean and flat, and allow enough time for the glue to dry properly. It’s a simple enough process that, you know, anyone can learn, and it’s a great skill to have for maintaining your own equipment.
How To Replace A Pool Cue Tip? 6 Steps To Change The Pool Cue Tip For
Replacing a Pool Cue Tip: 6 Easy Steps to do it Yourself | Pool Cues
How To Replace A Pool Cue Tip? 6 Steps To Change The Pool Cue Tip For
