Easy Nail Art Designs You Can Do At Home Today
Thinking about trying out some new nail looks but feeling a bit unsure where to start? Maybe you've seen those amazing designs online and wondered if you could ever create something similar yourself. Well, good news, because getting lovely nails doesn't have to be hard at all. You know, it's almost easier than you might think.
Many people believe you need a salon visit or fancy tools to get beautiful nail art. That, is that, just not true. Our aim here is to show you how simple it can be to get stunning results right from your own home. We're talking about looks that truly stand out, yet are surprisingly easy to put together.
This article is your friendly guide to discovering a whole world of easy nail art designs. We will share tips, simple techniques, and plenty of ideas perfect for beginners. You'll see how to use basic items and even your bare hands to make your nails look fantastic. So, get ready to find your next favorite nail style!
Table of Contents
- Why Try Easy Nail Art?
- Getting Started: What You Need (or Don't!)
- Simple Designs to Spark Your Creativity
- Great Ideas for Shorter Nails
- Step-by-Step Guidance for Beginners
- Your Questions Answered About Easy Nail Art
- Ready to Try It?
Why Try Easy Nail Art?
Giving your nails a fresh look can really brighten your day, you know? It's a simple way to express yourself and show off your personal style. Plus, doing your own nail art at home saves you time and money, which is pretty nice. You can change your look whenever you feel like it, without needing to book an appointment.
Many people think nail art means spending hours with tiny brushes and complicated patterns. That's just not the case. There are so many easy nail art designs that anyone can do. Seriously, you can get salon-worthy results with very little effort. It's a fun, creative hobby that doesn't ask for a lot of skill.
Imagine having nails that catch the eye and make you feel good, all done by your own hand. It's a little bit of self-care that brings a lot of joy. Whether you're getting ready for a special event or just want to add some sparkle to your everyday, easy nail art is a great option. It’s a very satisfying feeling to show off your own creations, too.
Getting Started: What You Need (or Don't!)
You might be surprised by how few things you actually need to start creating easy nail art designs. Some designs need almost nothing beyond your nail polish collection. Others might benefit from a couple of inexpensive tools. We will talk about both ways to approach this, so you can pick what works for you.
The main thing you need is a good base coat, some colored polishes, and a top coat. These are your absolute basics for any manicure, whether plain or decorated. Having a variety of colors helps a lot, of course, but you can do plenty with just two or three shades. It's pretty amazing what you can achieve with just those simple items.
Remember, the goal here is to make nail art accessible for everyone. So, don't feel like you have to buy a lot of special things right away. You can start with what you have and add to your collection later if you find you really enjoy it. That, is that, a smart way to begin any new hobby, really.
Tools That Help
While many easy nail art designs don't need special items, a few simple tools can open up even more possibilities. These items are very affordable and make certain patterns much simpler to create. One of the most useful things to have is a set of nail art brushes. This nail art brush set features various sizes for drawing different nail lines and patterns. You can get very fine lines or wider strokes, which is quite helpful.
Another really helpful tool is a dotting tool. A dotting tool is a nail art must. It's ideal for creating dot designs on nails, whether you want dotted lines or just scattered spots. These tools have a small ball at the end, perfect for picking up polish and placing neat dots. They come in different sizes, so you can make tiny dots or bigger ones, too. They are actually very easy to use.
Some people also like nail art pens. The pens are easy to hold and paint with and will allow you to create precise details when creating your nail art. They are like markers for your nails, which can be very comfortable for drawing. You just draw directly onto your nail, which makes fine work a bit simpler. So, you know, these are good to consider.
Creating Art Without Special Tools
Did you know you can create stunning nail art designs with simple tools and techniques, even with no tools at all? It's true! This design is a saviour for those looking for easy nail art designs at home for beginners without tools. You just need a little creativity and some common household items. This approach is perfect if you are just starting out or want to try something quick without spending money.
For dots, you can use the end of a bobby pin, a toothpick, or even the tip of a pencil with an eraser. These items work just like a dotting tool, allowing you to pick up a small amount of polish and transfer it to your nail. It's surprisingly effective, you know. You can make polka dots or create tiny clusters of color.
To make lines or stripes, you can use a thin strip of tape. Apply your base color, let it dry completely, then place the tape where you want a clean line. Paint over it with a different color, then carefully peel the tape away while the polish is still wet. This method gives you very crisp lines, which is pretty neat. It's a simple trick that works well.
You can even use a small piece of sponge for textured looks. Just dab a bit of polish onto the sponge and gently press it onto your nail. This creates a speckled or gradient effect. It’s a very quick way to add some interesting texture. The pattern and texture offered would be modern and classy, too. So, you see, you don't need much to get started.
Simple Designs to Spark Your Creativity
Now for the fun part: exploring some truly easy nail art designs you can try right away. From polka dots to marble, from flowers to animals, find your favorite look and follow the video guides and inspirational photos (conceptually, as mentioned in "My text"). We've picked designs that are perfect for beginners and don't require a steady hand or years of practice. You know, these are looks that anyone can master.
The key to success with these designs is patience and thin coats of polish. Always let each layer dry well before adding the next. This helps prevent smudges and makes your design last longer. It’s a bit like painting on a canvas; you want a good foundation. So, take your time, and enjoy the process. It's actually very relaxing.
We've rounded up 35 simple nail designs that you could even recreate at home. These simple nail art designs are at your fingertips (literally). Here are 30 of our favorite simple design ideas easy enough to do at home on your own, plus expert recommendations to help you diy them. You will find that these designs are not fussy at all. They are quite straightforward.
Dazzling Dots
Polka dots are probably the easiest nail art design to start with. They are incredibly versatile and look cute on any nail length. You can make big dots, tiny dots, or a mix of both. All you need is a base color and a contrasting polish for the dots. A dotting tool or even a toothpick works perfectly for this. It's very simple, really.
To create polka dots, first apply your base color and let it dry completely. Then, put a small puddle of your dot color on a piece of foil or wax paper. Dip your dotting tool into the polish and gently press it onto your nail where you want a dot. Repeat for as many dots as you like. You can make them evenly spaced or scattered randomly, which is pretty fun. So, you know, experiment a bit.
You can try different color combinations, too. Black dots on a white base look classic. Bright dots on a nude base are very playful. Or, you could do dots of several different colors on one nail for a party look. It's a very forgiving design, meaning if a dot isn't perfect, it still looks charming. This design is a saviour for those looking for easy nail art designs at home for beginners without tools, or with minimal tools.
Marvelous Marble Effects
Creating a marble effect might sound complicated, but there are some very easy ways to do it at home. This look gives your nails a sophisticated and modern appearance. The pattern and texture offered would be modern and classy. You can use two or three colors that blend well together, like white, gray, and black for a classic marble, or brighter colors for a more artistic feel. It’s a pretty striking look, you know.
One simple method involves using a plastic bag or cling film. Apply your base color and let it get tacky, but not fully dry. Then, dab a small amount of your second color onto a crumpled piece of plastic. Gently press the crumpled plastic onto your nail. This transfers the color in a random, swirly pattern, like marble. It’s surprisingly effective and quick. You can even add a third color for more depth, too.
Another way is to use a toothpick or a fine brush on wet polish. Apply your base color, then immediately add a few drops or lines of your second color onto the wet base. Quickly drag the toothpick or brush through the colors to swirl them together. This creates a beautiful, unique marble pattern on each nail. It's a bit messy, perhaps, but the results are very worth it. So, give it a try!
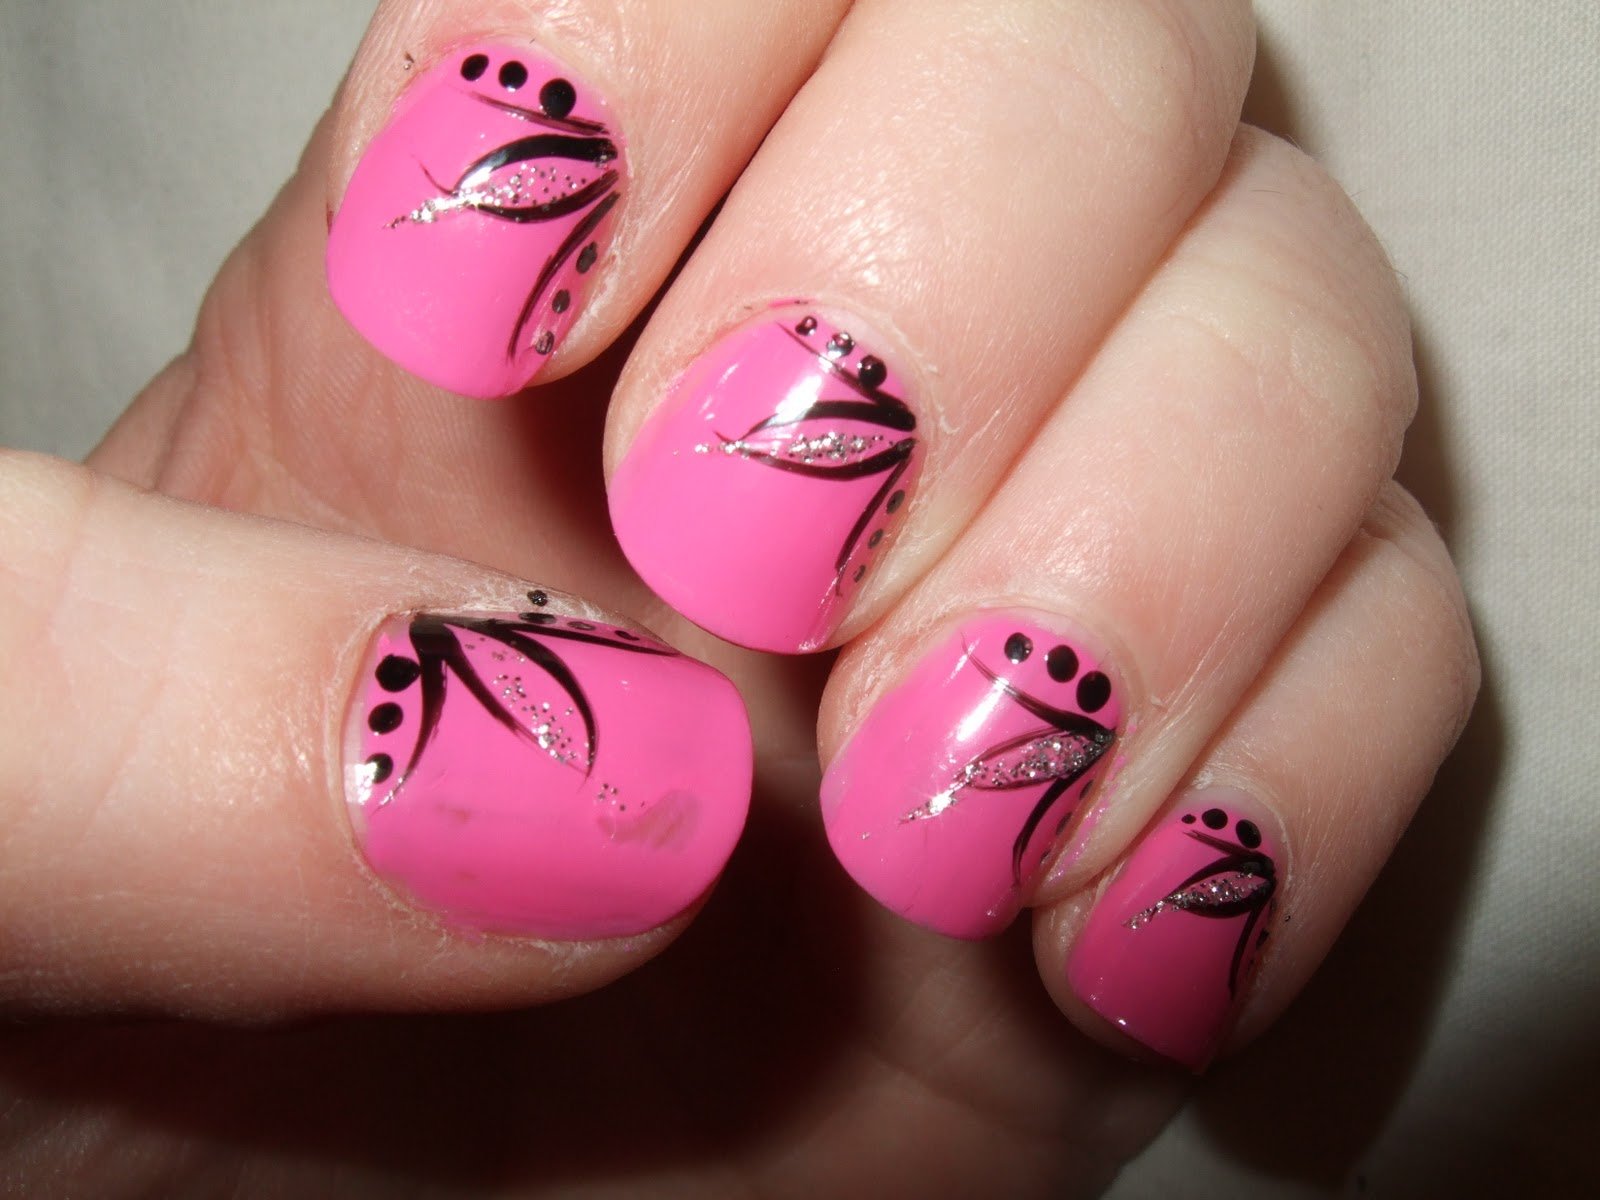
Pretty Petals and Leafy Looks
Flower designs can be much simpler than they appear. You don't need to be an artist to create cute floral patterns on your nails. These designs add a touch of sweetness and charm. You can make them as detailed or as abstract as you like. It's a very cheerful look, you know, especially for spring or summer.
For simple flowers, use a dotting tool or the end of a bobby pin. Apply a base color. Then, use a contrasting color to make five small dots in a circle, forming the petals of a flower. Add a tiny dot of another color in the center for the flower's middle. That's it! You have a simple flower. You can make tiny flowers all over your nail or one larger one as an accent. It’s pretty straightforward.
To add leaves, use a very fine brush or a toothpick. Dip it in green polish and draw tiny V-shapes next to your flowers. These simple shapes instantly look like leaves. You can also just draw a small curved line for a stem. These little additions really bring the design to life. So, you know, don't be afraid to try adding these details. It's actually quite fun.
Fun Animal Prints
Animal prints like leopard spots or zebra stripes are surprisingly easy to recreate on your nails. They add a bold and playful touch to your manicure. These designs are very popular and can be adapted to many different color schemes. You can make them subtle or really make them pop, which is pretty cool.
For leopard print, apply a base color, perhaps a nude or light brown. Let it dry well. Then, use a small brush or a toothpick to create irregular, blob-like shapes in a darker color, like tan or gold. These don't need to be perfect circles; uneven shapes look more natural. Once those are dry, take a very fine brush or a black nail art pen and draw small, broken lines around the blobs. Don't outline them completely; just add a few dashes. This creates the classic leopard spot look. It's a bit messy, but in a good way.
Zebra stripes are also quite simple. Paint your nails white or a light color as a base. Once dry, use a black nail art pen or a fine brush to draw wavy, uneven lines across your nail. Start from one side and make them slightly thicker at one end, tapering off. These lines don't need to be perfectly straight or parallel. The more organic they look, the better. It’s a very striking design, and you can actually do it pretty quickly.
Great Ideas for Shorter Nails
If you have short nails, you might think nail art isn't for you. But that's not true at all! Ideas for *really* easy nail art for short nails are plentiful. Many simple designs look fantastic on shorter nail beds. In fact, some patterns look even better on short nails because they don't get too busy. It's a very common misconception that long nails are needed.
Simple dots, single stripes, or a small accent design on just one nail are perfect for short nails. A minimalist manicure can benefit from nail art. From subtle pops of color to easy diy hacks, find 20 simple nail designs that will effortlessly elevate your next mani. You can try a single horizontal line across the tip of your nail for a modern look. Or, a small heart or star near the cuticle can be very charming. These quick and easy designs that beginners can do from home, even with no tools, work wonderfully on shorter nails.
Negative space designs also work really well on short nails. This means leaving some parts of your natural nail showing through the design. For example, you could paint just the tips, or create a half-moon shape at the base of your nail, leaving the rest clear. This creates an interesting contrast and makes your nails look neat and stylish. It’s a pretty chic option, you know. So, don't let short nails stop you!
Step-by-Step Guidance for Beginners
Learning easy nail art designs with this given step by step tutorial pictures (conceptually, as mentioned in "My text") can make a big difference. The key to success is to go one step at a time. Don't rush the process, especially when you are just starting out. Each step builds on the last, so patience is a good thing to have. You know, it really helps.
Here is the 15 easy and simple nail designs for beginners to do at home. For any design, always begin with clean, dry nails. Apply a base coat to protect your natural nails and help your polish last longer. This is a very important first step. Let the base coat dry completely before moving on. It's pretty essential for a good outcome.
Next, apply two thin coats of your chosen base color. Thin coats dry faster and look smoother than one thick coat. Make sure each coat is fully dry before applying the next one. This takes a little time, but it prevents smudges later on. Then, you can start with your design elements, like dots or lines. Finish with a good quality top coat to seal your design and add shine. This makes your hard work last longer, which is pretty satisfying. You can discover 8 easy to do nail art designs perfect for beginners. Learn more about nail art on our site.
Your Questions Answered About Easy Nail Art
We often hear common questions from people curious about trying nail art at home. Here are some answers to help you feel more confident about starting your own nail art journey. These questions often come up, you know, when people are just getting started.
What is the easiest nail art to do at home?
Many people find simple dots or stripes to be the easiest nail art designs to do at home. Polka dots are very forgiving; even if they aren't perfectly round, they still look charming. You can use a dotting tool or even a toothpick. Stripes can be done with a thin brush or even by using tape as a guide. These designs need very little special skill and give great results. They are pretty much instant classics.
Another very easy option is a glitter accent nail. Just paint one nail with a sparkly polish while the others are a solid color. This adds a touch of glamour without any drawing or complex steps. It's a quick way to make your manicure look special. You know, it's a popular choice for a reason. Simple color blocking, using two or three colors on different parts of the nail, is also quite simple and looks very modern.
For something a bit more unique but still easy, try a water marble effect with just a few drops of polish on water, then swirling it with a toothpick before dipping your nail. This creates a very cool, organic pattern that looks complex but is surprisingly simple to achieve. It’s a bit messy, but the outcome is really neat. So, there are many choices that are truly easy.
How can I do nail art without tools?
You can absolutely do beautiful nail art without any special tools. Your hands and some everyday items are all you need. For dots, you can use the rounded end of a bobby pin, the tip of a toothpick, or even a pen with an empty ink cartridge. These can pick up small amounts of polish and create perfect dots. It's a very clever workaround, you know.
To create lines or geometric shapes, you can use regular scotch tape. Paint your base color, let it dry completely, then stick pieces of tape on your nail to block off areas. Paint over the tape, and then peel it off while the polish is still wet. This gives you crisp, clean lines. It’s a pretty effective method for getting precise shapes. You can also use the edge of a piece of paper for straight lines, too.
For unique textures, a crumpled piece of plastic wrap or a small sponge can be your best friend. Dab a little polish onto the plastic or sponge, then gently press it onto your nail for a textured or marbled look. This creates a very interesting effect with minimal effort. So, you see, you don't need a fancy kit to get creative.
What are some simple nail designs for short nails?
Short nails are actually a fantastic canvas for many simple nail designs. Minimalist patterns tend to look especially chic on shorter lengths. A single thin stripe, either horizontal or vertical, can make short nails look longer and more elegant. You can use a nail art pen or a very fine brush for this, or even a piece of tape for a super straight line. It's a very clean and modern look.
Accent nails are also perfect for short nails. Just paint one nail a different color or add a simple design like a single dot or a small heart. This draws attention without making the overall look too busy. It's a pretty way to add a pop of fun. A small, subtle glitter fade from the tip or base of the nail can also look very pretty on short nails, too.
Another great idea for short nails is to use negative space. This means leaving some of your natural nail visible. You could paint only the tips of your nails, creating a "reverse French tip," or paint half of your nail diagonally. This creates an interesting visual effect and makes your nails appear neat and stylish. It’s a very popular trend right now, you know, and works wonderfully on any nail length, especially short ones.
Ready to Try It?
We hope this guide has shown you just how accessible and fun easy nail art designs can be. You really don't need to be an expert or
33 Nail Art Designs to Inspire You – The WoW Style

26 Glamorous Nail Art Designs | Trendy nail art designs, Nails

Nail Art Designs For a Complete Unique Look - Ohh My My
